Tuesday, January 9, 2007

Adding a photo to your profile

It will be nice if your viewers can see an image rather than the default head and shoulders shot when they click on your profile.

Go to your Blogger OVERVIEW- click on your name in the top right hand corner.


Click EDIT PROFILE.


Scroll down a bit until you see PROFILE PHOTO. Chose a file to upload.


Save it at the bottom of the page.

Getting Rid of the top Navigation Bar

The navigation bar at the very top of your blog can be a worry if your blog is going to be viewed by young children as the NEXT BLOG option could lead them to random places that it is not good that they go.

This bar can be removed if you want by placing a little bit of code in the blog template. Tricky but cunning!

Here is how to do it.

1. Firstly- seeing you have got rid of the Navigation Bar you still want a link to the Blogger log in page.

Go to your Overview and go to LAYOUT.


Click on add a gadget.


Scroll down the list til you get to LOGO. Click on the PLUS sign to add it.


Chose one of the LOGO colours that you like and click SAVE.


Now all you need to do is click on the Blogger logo and it will take you to the Blogger log in page.

2. Now go to the OVERVIEW, then go to LAYOUT.

Look for NAVBAR and click on edit.


Look for where it says OFF in the pop up box. Click and save it and your work is done!.


3. This is another way to get rid of the Navigation Bar using html.

 Copy this bit of html code.


#navbar-iframe {
height:0px;
visibility:hidden;
display:none
}


Then go to the OVERVIEW and go to the TEMPLATE.

Click on it. Then click on EDIT HTML.


You will get told to be careful but procede any way.


Usually you paste the code under the second dotty line. Each template can be slightly different.


Click PREVIEW to check of the navigation bar at the top has really gone.

If it has, click SAVE TEMPLATE- if it hasn't try the code somewhere else.

I would add once more that it is a good idea to preview the changes before you actually publish them in case you have put the code in the wrong place. If you muck it up just discard the changes and try again.


Changing your Blogger Header

Changing your Blogger Header can involve a bit of trial and error as everyone's blog will be a different width.

Firstly chose an image than can be fairly long and thin.

I use Preview on my Apple laptop to edit the photo because it is standard on all Apple laptops.


Use the Tool Menu to crop your original photo.


Now use the tool menu again to adjust the size to about 1000px wide. Don't worry about the height.


Save the resized image to your desktop so you can easily find it.


Go to your OVERVIEW and go to LAYOUT.


Look where it says EDIT THE HEADER


Upload your cropped and resized photo.


 See how my photo is a bit too long and it sticks out the side. You can fix that.


Go back to the OVERVIEW. Click on TEMPLATE, then CUSTOMISE and ADJUST THE WIDTH until you get it just right.


When you do APPLY IT TO YOUR BLOG.


PERFECT!

Adding an Email Subscription

With an email subscription your readers will get an email telling them each time you update your blog.

I think it would be a great way to encourage contributions from parents/whanau as they will quickly know when you update.

There are two ways of doing it- the old way which is really complicated or the easy way. You decide which you would prefer to do. The easy way is first and the hard way is second as I would suggest that most people will chose the easy way.

It's easy....

Go to your OVERVIEW. Click on LAYOUT.


Click on ADD A GADGET.


A list comes up. Scroll down to until you find 'FOLLOW BY EMAIL'.

Click on the blue plus sign.


Sweet! That's all you need to do.

Adding Text to the sidebar

Go to your layout template dashboard and click on Add an element as you do and select TEXT.

Type what you want- change the colour etc and add a link if you want and save the changes.

Adding a Viewer Voter's Poll

So you want a little feedback on your blog, what about a interactive questionnaire that people can vote on!!!

Nice and simple- go to your dashboard and click on a layout and then Choose a New Page Element. Click on Poll!
Title your voter's poll and add the questions and then choose the closing time for your poll. Publish! You may like to drag your poll to the place you want it in your layout and save the changes! Easy as!

Allowing a pdf type download from the Blog

This can be a bit tricky but cool when it works.
First of all you need to set up another blog or wiki that allows file hosting. Again I suggest you keep the username and passowrd the same to keep it simple.
I have used Edublogs
Edublog Website
Make a post and upload the file you want.

Once uploaded click on it to open the web page it is on and link that to your blog.
How to create a delicious account
Click on the link above to see how the download will look. It is a good idea to make your file that everyone can read like a pdf or if that is too tricky maybe a WORD document that most computers can see.

Adding a PhotoPeach Slideshow

Firstly go to PhotoPeach and sign up with an email and password.


Then to create a slideshow you can uplaod photos directly from your computer or allow access from to your Flickr sets.

I decided to upload from my computer- it took a little while to upload all the photos but I have lots of other work to do while I waited!
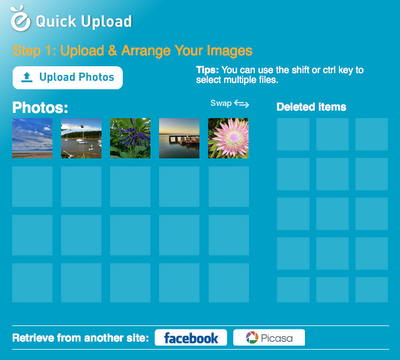
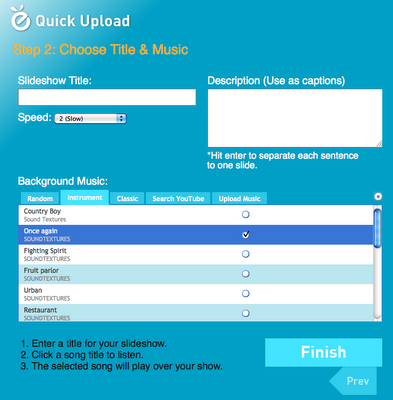
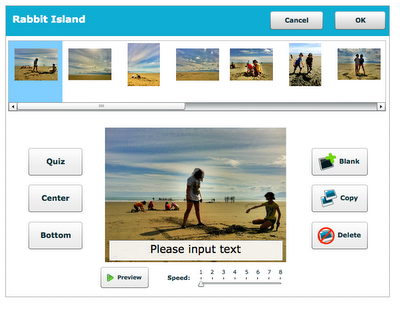
You can then arange your photos or delete them if you change your mind. Then hit NEXT.


Add a title. Then you can either choose their music or search YouTube sound tracks to play the sound track you would like. You can add captions just by clicking on the playing photo.

If you click on edit photos you can also make a cute little quiz with Photopeach.


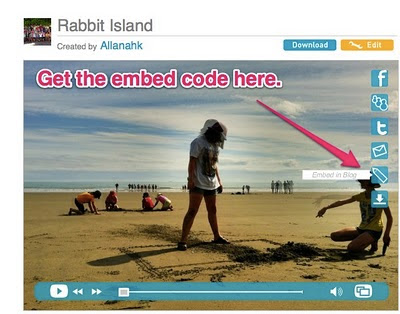
Now you can embed it in your blog. To get the html embed code hover over the playing movie and you will see a pencil shape. Click on it and you will be prompted to allow public viewing. You get two kinds of embed- the spiral and the story. The story is better!


The embedded slideshow sits perfectly inside Blogger. To post the html embed code make sure you copy it into the html tag on your blog post.


If you want to have no comments on your Photopeach slide show make the show and then edit it and manage the comments- changing it to no comments and save the changes.


This is what the finished thing looks like....


Noticed in early 2016 that when you go to embed the Photopeach into Blogger you get an error message and it times out. All you have to do is dismiss the error message and post like you would normally do.

Here is a little video to make that clear.


Adding VoiceThread to your blog

VoiceThread is a great tool for collaborative learning where you can record a voice-over to your photos and invite audio comments.


I have made this pdf that you can download that will take through all the steps to making a Voicethread. Click here to get it.

Here is the basic outline of what is in the pdf. Firstly you do the registering thing that you are by now very used to.

Click on CREATE and add a title and description for your VoiceThread. Upload the images that you want to use. This may take a little time at high resolution but be patient.


When the uploading is finished you will see an organiser. You can change the order that you want the photos to play by dragging them to where you want them to be.


Once your order is sorted record your voice-over or type your message. You can re-record your message if you muck it up. Once happy with your sound byte click save and move on to the next photo.


Add some new commenters by adding a name and a photo.
When a new person wants to add a comment click on SWITCH (top right hand corner). Annd add a new avatar and name.

Now you have switched identities to the one who wants to add comment they can record their comment and it will play after your initial sound byte. For the purposes of this practice I have pretended to be my student Jane!

For the security conscious you can of course turn on comment moderation in the options pane and the world (or other children) will not be able to hear the comments unless you approve them.

Be sure to change your Voicethread to public if you want others to be able to see and hear your VoiceThread.


When you are happy click on Share and decide your sharing options- you need to make your Voicethread public, turn on comment moderation and you may like to let it be added to the Browser if you are OK for random others to enjoy your Voicethread.

To put your Voicethread in the public arena click on Embed to embed or link from your blog or wiki. Decide what options you want. Clicking on the code selects it- then you can copy it and insert it into your blog. You can change the width and height for your space to fit your Blogger template if you want but be careful to keep the aspect ratio right otherwise your VoiceThread will look lopsided. For this blog post I changed the size to 600x600. For a Voicethread on how this works click here. I can see lots of possibilities for this tool. If you can think of some or link to some ways you have used it please leave a comment.

You can also construct Voicethreads via your iPad. To get the app click on the link below.

http://itunes.apple.com/nz/app/voicethread/id465159110?mt=8

Full length Educational Animoto Video


I asked Animoto if I could have permission to have a longer than 30 second animoto video to record our cluster events for Term One, 2008. They did. The bonus is that you can download them to your hard drive and you don't have to be connected to the internet to view the movies.

To get a code for your class talk to Rebecca at Animoto by using this link.

Adding a PowerPoint Presentation

First of all you need to have your PowerPoint presentation made. As you make the slideshow give some thought to the size of the font you are using and try and keep it fairly simple.Go to Slideshare Website and register using your Gmail address and password to keep things simple. They will send you a confirmation email to respond to.

Go to upload slideshow.
Browse to your Powerpoint presentation and upload it. When it is done you may have to wait a few moments before it is converted.Click on your presentation and you will see a box on the left where it says enbed in your blog and click on the html code to select it. Copy and paste it into the new post and there you are!

Adding Scrapbooked Photos

This is very cool to add a bit of zing to your photographs. With it you can add frames, borders, text boxes and stickers.


First of all you need to register like always use the same gmail and password to keep things simple.

Once that is done launch the scrapbook builder.
Create a new scrapbook.
Give this particular scrapboog and name and an URL should you want to look at it separately from your Blogger blog. Decide whether you want to make it private or public.
Select a theme.
Now get some photos to add to the theme you have selected.
Click on the Get Photos link in the top left hand corner.
You can collect them from your Flickr account directly if you have one or upload the photos in batches of three if you want.
Again I have reduced the size of the photos in iPhoto to 500 whatevers to make the uploading process quicker.
You can upload another batch of three or not.
Then add them to your scrapblog.
To get the photos into the frame just drag them. You will have to resize them and fiddle around a bit with the layering of the text, photos and frame but all the menus are on the right hand side and it is pretty easy to work out.
Now I go APPLE, SHIFT + 4 all at the same time and drag the crosshairs where I want the screen capture to be and I have like a photo of the screen. I then upload that to Blogger in the usual way. On a PC you probably need to click the PRINT SCREEN key and drop it into the image editor to crop it to the desired size.
Isn't that very cool with a bit more bling! It is almost like a free on-line version of Photoshop with templates- a good way of introducing the concept of layers.