Tuesday, January 9, 2007

Adding a Photostory 3 movie to yr blog

Firstly make your Photostory 3 slideshow. Don't make it too long or it will take forever to upload. Save it as a Photostory in case you want to edit it later but also save it for playback on your computer to compress it.

Mine looked like a black box when it was done.
This is how the movie looked when I went to play it. Close it when you have admired your handiwork.


Now log on to the internet and go to Zamzar to convert it to a .mov file.


Do these four steps. Go and have a cup of coffee or something useful!


Go look at your email and you will have a hello from Zamzar to say they have converted your .wmv file to .mov


Now open up Blogger and make a new post and write the titles etc. Click on the little movie next to the add a photo button.


The screen will go cloudy for a bit then you will get to browse to the movie you want to upload- add a title and promise not to upload copyrighted movies and Blogger will upload it in its own sweet time.

While Blogger is uploading and processing your movie go and do something physical to prove that you don't just in front of the computer all day and night.


Eventually Blogger will process the movie and you will be ale to see the first frame in your post.

Publish it and you are done. You clever thing you!

Adding a Blogger Video

Blogger have recently added a new feature- adding a video! Next to the add a photo icon there is now a little video icon.
Click on it and you will be asked to find the video, give it a title and agree to the Blogger Terms and Conditions.
It will take a little while while it uploads the video and processes it so it would be best not to upload long movies!
And there you have it. Your own video on your blog.


Adding a YouTube video to your blog

There are a number of ways of adding a video to your blog.

I like YouTube as you can use your gmail address to log in. Go to YouTube, log in and click on the link that says upload your video.

Fill in your particulars.
Have your short video on the desktop ready to go. Browse to it and fill in all of the fields. Upload the video.


I would also change the comment ability so the comments are moderated.

To actually embed the video in your blog....

Click where it says embed this video on your website or blog. And untick the box that says related videos will show. Copy the html into your blog post on the html tab and click SAVE!


Here is a video to show you how to get the embed code from a random You Tube Video. To get to the desktop version skim the video to the third minute- the beginning part looks at the whole process on an iPad.


Here is a video to show you how you can embed your own videos.


I also like Vimeo as Vimeo videos play nicely on the iPad.

How to use Dropbox to add media to your blog

Using Dropbox is a great way to store your stuff on line but you can also use it to link to other media like pdfs, video, audio and content that you have made but that Blogger won't handle. It does all the tricky stuff for you.

The first thing you need to do is got to Dropbox and make an account. Then download the Dropbox application.


Launch the application and it will put a little icon on your taskbar. (On an Apple the icon is in the top menu bar, on the bottom in Windows). There is an iPad app as well.

When you click on it it will get an option to open a folder. Now you can put stuff in it. You can now go to any computer, log in to Dropbox via the web and have access to your content.

If you haven't got Dropbox installed (say you are at a friend's place and want to show them something) you can still go to the Dropbox website- log in- and download your stuff.


To work on you computer with Dropbox downloaded......

My Dropbox has got stuff in it now but it comes standard with a Public Folder- put the content you want to link to in that. I have made my Dropbox folder all pretty cos I'm an Apple user but yours will look something like this but without all the pretty colours and the stuff that I've already uploaded.

Once your content- a movie, pdf, audio or whatever is in your Public Folder go to the website by clicking on the wee box in your task bar and clicking Launch Dropbox website.


Now click on the public folder to open it.


Find the file that you want to make publicly downloadable on your blog. Click on it to highlight it and copy the public link.


A little box will come up with a web URL so you can share your files on your blog.

Copy the public link.


Paste this into your blog and make it into a link by highlighting it clicking up to the link button, paste the link into the pop up box and you are there.

Click publish and all people have to do now is to click on your link and they can listen to or download your media.

Like this!

http://dl.dropbox.com/u/879523/Alex.mp3

Or this when you have made it into a hyperlink. Here's the blog post to show you how to make text into a hyperlink.

Alex's Story.


Outstanding!

Adding Audio with Podomatic

I found this way of adding audio simpler than using FileDen as I already have a Podomatic podcast page but you may need to create one if you haven't already. Making a podcast page is way easier than registering with FileDen.

Firstly go to Podomatic and register.
Fill out all the fields.
Choose a photo that typifies your look!Click where it says to post your first audio file.
Then upload your podcast .mp3 or .mov file
Fill out all the fields appropriately.
Now give your podcast a title and desciption so people know what it's about. I also like to tell people how long it is and how large a download it might be. My upper limit is 20MB- OK for broadband without taking too long.
Then add a photo that typifies what your podcast is about.
Change the filtering to CLEAN and add some tags to help people find your podcast.
Lastly post your episode. Wait for a bit and Podomatic will format your podcast and you will be able to listen to it.

Plan A: Now click on 'Get the Word out...'
Pretend that you are going to create a bookmark for your podcast so you can get the URL for it.Copy the URL that Delicious gives you and change the word 'entry' to 'enclosure' and put .mp3 at the end then copy the whole URL.

Your link that looked like this...

will now look like this...


Now surround that URL with the following bit of code and put it in the EDIT HTML part of your blog post, publish it and it will play directly into your blog.

Plan B:
Now you need to be using FireFox as your web browser which is always a good idea anyway!

Then download Unplug which lets you save video and audio which is embedded on a webpage. After you download and install it open your podcast page and then click on the wee fish.
Here is your media list from Podomatic. Right click on the link and COPY THE LINK LOCATION.
Now carefully insert the link location into this bit of code and publish your post.
To make it easier for you to copy the code I have linked a pdf to this page so you can just open it and copy the text into your blog and change the link location.

PDF with the html code on it.

Your audio will look like this..


If you are publishing a video podcast you need to change the size of the object to 300x400.


Beware though that I can only get this technique to work with .mp3 and .mov files not enhanced podcasts made in Garageband.

To share your enhanced podcasts made in Garageband you need to send them to iTunes and go ADVANCED - Convert selection to MP3 and upload that to Podomatic.

If anyone out there knows of a way to embed .m4a or .m4v files I would love to know!!

It would be great if you could share your successful adding of audio comments through the blog comments.

http://ianlambie.podomatic.com/enclosure/2007-03-25T17_07_05-07_00.mp3


After all that I decided to make a little video that will show you how to do if you are stuck.


I see that Podomatic has changed its look a little so I will have to redo this section when I get a minute.

Blogging from your iDevice

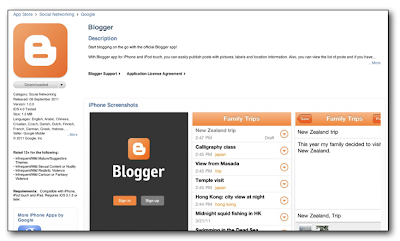
If you want to blog from your iPod Touch, iPad or iPhone I would recommend the Blogger's own free app: Blogger. Sadly this is no longer available from the app store so these instructions will only work if you already have the app.

Look to the bottom of this post for an alternative idea......


Download the app first.


Sign in with your Blogger email and password.


Let the app access your photos so you can upload them. 

Write the title, text and upload or take photos to illustrate the post.


The little circle on the bottom right helps you geo-locate where you are posting from should you want to do that.

All done.

- - - - - - - - - - - - - - - - - - - - - - - - - - - - - - - - - - - - - - - - - - - - - - - - 

ALTERNATIVE TO USING THE BLOGGER APP

 
1) Go to Blogger.com using the Google Chrome Browser
 
2) Click the More Actions Icon (3 vertical dots on the right side of Chrome Browser)
 
3) Click Request Desktop Site
 
4) Click blog title- add your text, photos or video
 
5) Click Post & Publish

Live Blogging

This little exercise is not so much a 'how to' but a place to host a live blogging event I want to play with at Learning At School 2008 in Rotorua, New Zealand at 11:15am on February 21. Use this world clock fixed time to work out when the event will take place if you are outside NZ.

The event is called, "Did You Know- New Zealand?" lead by Simon Evans and based on Karl Fisch's compelling video entitled "Did you know?"


What does it mean for New Zealand education? The new curriculum has leeway to build the curriculum that our communities deserve, but how are we, as educators, going to provide the learning contexts that will make education relevant for 21st century New Zealand. We will take a look at the works of Fisch, Friedman and others, and consider the impact upon us in the New Zealand context. This open mic discussion will enable participates to play an active role in envisioning New Zealand's educational future, and our role in it.


To do this I have had to use Blogger as Edublogs does not allow embedding of iframes for security reasons. The live blogging tool I am playing with is Coveritlive. It will be fun if it works all right- with this tool you can join in the live blogging conversation via instant messaging so it will almost be like being there apart from the fact you're not!